Image Manipulation in Pixlr
In this assignment you will learn to use Pixlr, a free alternative to Adobe's Photoshop application, one of the suite of main tools used by professional computer graphics artists and web page designers.
Pixlr is a free online image editing program that does not require a download. The program is available at http://pixlr.com/editor/
Several items in the assignment will have you create graphics for your project web page; these items are noted (**). Recall that your project will be based on your assigned Computing Innovations topic. You will make the actual web page in a later assignment using some of the graphics that you create in this assignment.
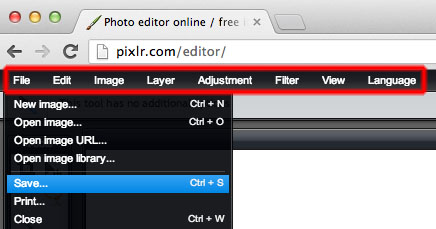
Saving your work: Pixlr is a web based image editing program; if you close your browser window without saving your work, you will not be able to retrieve it. Save your work regularly. Be sure to use Pixlr's file menu bar when saving, NOT the browser's file menu. Pixlr's menu options are located below the browsers address bar as shown below.
- Pixlr Basics.
Watch the Pixlr Tutorial & Training video. The video consists of 32 Chapters (or mini tutorials - view the table of contents). This video is meant to teach you some of the basic Pixlr tools and techniques, most of which will be used in the following steps.
- Create Bitmap Image:
Use Pixlr to create a bitmap image (BMP extension).
- Open Pixlr and select "Create a new image". When prompted, change the name to "MyImage" and select a preset size of 640 x 480.
- In the blank (white) image provided, quickly draw a picture using at least 4 different colors (don't worry, we don't grade on artistic talent!). To change the color click the color box at the bottom of the tool box and then move the circle in the diamond to the right (away from the black) and choose a color in the outside circle
- When you are satisfied with your masterpiece, select the Save option from Pixlr's File menu. In the resulting dialog box, change the name to "MyImage", select a format of "BMP Large but non-destructive" and click "OK". Select the Desktop as the location to save your MyImage.bmp
- Click Save. Do not close Pixlr yet!
- Create JPEG Image:
Using your open Pixlr drawing, do a "Save" from Pixlr's file menu. Keep the same name of "MyImage" and change the Format to "JPEG (Good for most photos)". The quality can stay at 80. Select the Desktop as the location to save your MyImage.jpg. You should now have a MyImage.bmp and a MyImage.jpg on your Desktop.
- Create a new Google Doc file called "lastname_image_answers".
In the document place your answers to the following questions:
- Which file is larger (in bytes), MyImage.bmp or MyImage.jpg? Why?
 Image Meta Data:
Similar to meta data that you identified in documents, images can contain meta data as well. Not all cameras record it, and the meta data can be lost if the image is modified. Use the meta data viewer at https://exifinfo.org/ to answer questions about the photograph to the right (you will either have to download the image, or determine its URL to be able to have the website tool examine it). In your lastname_image_answers document, number and answer these questions:
Image Meta Data:
Similar to meta data that you identified in documents, images can contain meta data as well. Not all cameras record it, and the meta data can be lost if the image is modified. Use the meta data viewer at https://exifinfo.org/ to answer questions about the photograph to the right (you will either have to download the image, or determine its URL to be able to have the website tool examine it). In your lastname_image_answers document, number and answer these questions:
- At what GPS latitude was the camera when the photo was taken?
- Use https://www.gps-coordinates.net/ to plug these coordinates (don't forget the North/South latitude value and the East/West longitude value) in the DMS boxes and hit Get Address to see where the picture was taken. What city was the picture taken in/near?
- In what year was the photo taken (last modified)?
- What kind of camera took the photo?
- Provide a screenshot showing all 4 answers.
- Work with an Original Photograph:
Obtain a digital image with you in the photo either by scanning a photo, using one from a digital camera, or an existing image that you might have on a social media site. Reduce the size and optimize the photograph to make it suitable for the web by using the skills covered in the tutorial above (resizing, cropping, etc.).
- Save the original (unedited) photo as lastnameOriginal.jpg (using your own lastname)
- Save the edited version as lastnamePhoto.jpg
- In your lastname_image_answers document, answer the following questions:
- Briefly explain what you did to edit the original photograph.
- Work With Layers.
Complete the tutorial on Understanding Layers in Pixlr. To do this tutorial, you will need to download the following files.
Note: In many browsers, clicking the links below will simply try to open the files, not download them. You must right click each of the links below and choose "Save link as" or "Save target as" to download the files.
- The file Start.pxd
- The file Hats.gif
- The file Basket.gif
- The final image should be called lastname_layers.jpg as instructed in the tutorial.
- Adding Texture to an Image.
Use a filter to alter the appearance of your lastnamePhoto.jpg (the difference should be noticeable).
- Save the final image as myFilteredImage.jpg.
- Provide the filter(s) name in your lastname_image_answers document
- **Create a Background Image for a Web Page
(see example).
Using techniques learned from the Pixlr Tutorial, create a suitable background image for a web page. This background image will be required on your project website. The background image must contain the following:
- Image must be appropriately related to your project topic and suitable for a background.
- A suitable background size should be large (approximately 1000-1200 pixels wide by 600-800 pixels high).
- Save your final background image as myBackground.jpg
- In your lastname_image_answers document, provide a brief description on what you did to edit the image.
- **Create a Logo (see example).
Use the skills you've learned so far to create a logo to represent your project topic. Here is an example tutorial on how to create a logo. You may want to search the Internet for images to incorporate into your logo by copy and pasting (this does not mean copying an existing logo and using it as your own - copied logos will receive zero points). The logo must contain the following:
- The text of your project topic title.
- An image, icon, or design (something other than text) that represents your topic
- A transparent background.
- The use of at least two different colors
- Save your final image as myLogo.png (it must be saved as a .png file to preserve the transparent background).
For some ideas and examples, take a look at some top ranking company logos.
- **Create A Banner For Your Web Page (see example).
Using this tutorial as a guide, create a banner for your project web page. It must contain the following elements:
- Size should be 800 x 200 pixels.
- The title of project that includes your innovation topic (e.g. The Impact of Smart Phones)
- Your name.
- Your logo (created in the previous step).
- The use of a textured/filtered or image background
- Save this image as a JPEG file type and name it myBanner.jpg
- **Create an Original Animation for your Web Page (see example).
Use ezgif.com to create your own animated GIF. Click on the "GIF Maker" tab to upload your images.
Animation requirements:
- Use at least three images:
- One image must be your logo.
- One image of your choosing (related to your project topic).
- One image of you.
- Change the delay time to 150.
- Name the final animation myAnimation.gif